By now, Frank may have already provided designs for your new website and they may be signed off ready for the development phase of the project. The next step will be to establish the hierarchical structure of the pages for your website using the template sitemap, which will help to determine where your content will sit throughout your website.
Preparing a sitemap can often be overlooked, but it is a necessary planning tool. This guide will help you to determine the order of your content and the relationship between each page - and, more importantly, understand the user journey and how users will navigate around your website.
Having a sitemap in place will:
- Help you to organise your content based on your users’ journey around the site rather than your own organisation’s needs
- Be an accessible document to all those involved in the project and help to determine the relationship between the site’s pages
- Enable you to highlight any gaps in the content and prepare this to be uploaded before or after go-live
- Help Frank to understand the user journey and assist with the website build of individual pages and their content
- If you have a website already, a revised sitemap will help to eradicate or update old or out-of-date content
- Assist in identifying any measures that may need to be put in place relating to content governance
We find that spreadsheets are the easiest and most logical way to lay out your site’s structure. Please complete the template below prior to the Initiation Call. Once the sitemap has been finalised, we will upload the file in .csv format to automatically create the pages on your new website with the exact page titles which you have provided to us. These titles can of course be changed at a later date, but it’s a great starting off point.
Columns in the sitemap template
- Level 1, 2, 3 and 4 are described in the next accordion. Level 4 is not part of the mega menu (drops down on hover). If your site map is very large, we can also hide Level 3 from the menu if required.
- Link from current site – if content is to be migrated directly from your current site, please enter the full URL from your current website here. Please note that we will not be able to access extranet pages unless we are given access (e.g. via a log in or VPN).
- Update/migrate/new – Please specify which of the options is applicable. Will the content be migrated but with changes (supplied in a Word document), migrated directly, or will it be brand new content (this will need to be supplied to us in a Word document, with any related files uploaded to Basecamp).
- Notes – any additional instructions can be added in here. Frank will also use this column when adding the content to your new site, to note down if a document is missing on the page, for example.
Please feel free to add any additional columns into the sitemap if you feel that they will be helpful.
Level 1
Firstly, you should consider your Level 1 pages. These are usually displayed in a navigation bar at the top of every page of your website, beneath the header area, and should direct users to the main areas of your website – we would usually suggest around 5-8 Level 1 links, although this is not set in stone. As you can see from the example image below, only a certain number of pages can fit within the navigation bar due to the constraints of the browser, and this must be taken into consideration when creating your sitemap.
Example of Level 1 pages

Level 2
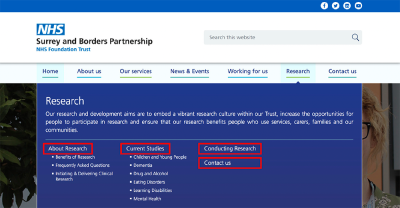
Level 2 pages sit beneath Level 1 pages in the sitemap and can be accessed using a dropdown menu (meganav). These are the key pages related to the page above them – for example, in the example below, the Level 1 page highlighted is ‘Research’ and the Level 2 pages sitting below this are ‘About Research’, ‘Current Studies’, ‘Conducting Research’ and ‘Contact Us’.
Example of Level 2 pages
Level 3
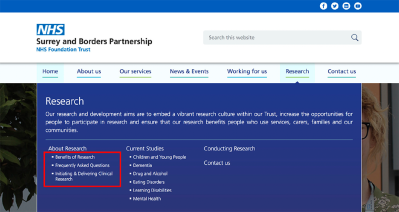
Level 3 pages sit beneath Level 2 pages in the sitemap and, again, can be accessed using a dropdown menu. These are the key pages related to the page above them – for example, in the example below, the Level 2 page is ‘About Research’ and the Level 2 pages sitting below this are ‘Benefits of Research’, ‘Frequently Asked Questions’ and ‘Initiating and Delivering Clinical Research’ – all of these relate to the topic ‘About Research’.
Example of Level 3 pages
Level 4
Level 4 pages sit beneath Level 3 pages in the sitemap. To avoid dropdown menus becoming too large (and therefore more difficult to navigate, especially for those with impaired motor skills), we usually suggest that Level 4 pages are accessed using links on the page itself. For example, a Level 3 page might show a grid of image links. Clicking on one of these links would take the user to a Level 4 page. In the example below, we can see the Level 3 page called ‘Dementia’, which is shown in the dropdown menu above.
In the dropdown menu, no pages are listed below ‘Dementia’ – however, by visiting the page, the user can access further information via the image grid of Level 4 pages (this is an automated 'page list' showing all of the child pages. When displayed as an image grid, we call this a 'thumbnail grid'):

The same can be achieved using sidebar navigation menus, although many clients and our designers prefer to use the more modern image grid approach. You can see a sidebar navigation example below:
There are various methods for planning your website structure. One of the easiest ways to do this is using cards or post it notes on a board or table.
- First you will need to determine the top level navigation by writing each page on a card or post-it note
- Once agreed you can begin to work on the sub-pages that sit under each of the headers in your navigation, using a card or post it note to represent each page
- Using this visual method means you and your team can easily move pages around until you are agree the structure
Let’s look at the Excel sitemap and see how the ‘Research’ section we’ve been looking at would be presented:
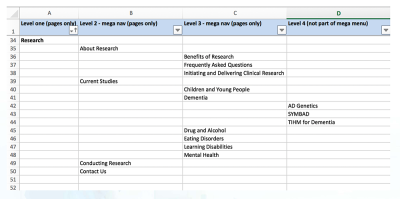
As you can see, the 3 links that sit below ‘Dementia’ will not appear in the navigation drop-down menu, but still need to appear in the sitemap spreadsheet in order to be added to the correct area of the site.
It is worth noting that you will only need to add the page titles to the Level 1/2/3/4 sections rather than extra information such as what will appear on the page.
Tips
- 1 row in the template = 1 page. Unique page titles only (e.g. you don't need to add the parent page, that will have its own line above)
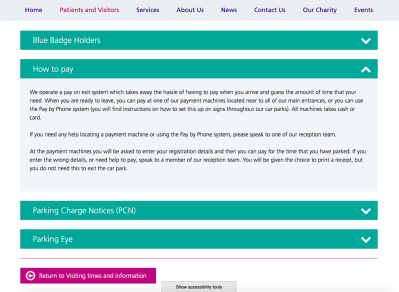
- You may have some pages with a very small amount of content. These can be added to the website as ‘accordion content’ (see image below), rather than sitting on their own page. A block with a title will be added to the page and the user can click on this to expand the box. Accordions should not be included as a row on the sitemap, but rather highlighted within the content documents you provide to Frank.
- Duplicating content across your site should be avoided, so you don't update in two places. If you want content to appear in more than one place (e.g. under Patients & Visitors first, but also as the Professional) you can use either:
- an alias page - this is a live copy that lives elsewhere, only the original can be edited, but the breadcrumbs will keep the user in the Alias area (Professionals in this example)
- a redirect - this will appear in the site map / navigation under Professionals but when clicked will send the user to the original section (the breadcrumbs will display Patients & Visitors)
- Pages can be ‘hidden’ from your website if your content is not ready for go-live, but these pages should still appear in your sitemap
If you need any help or support with the creation of your sitemap, please don’t hesitate to get in contact with us via Basecamp or by calling us on 0161 955 3502.
Summary
- Use the template provided
- Each row is a page - so just one page per row, you don't need to put the parent page in the same row
- Accordions shouldn't appear as rows - you can reference these in the notes if you need to
- Links or buttons (e.g. on the home page) shouldn't appear in the template either
- Shorter, simple page names are best - especially for Levels 1 - 3 that will appear in the mega-nav